What are you waiting for?
Why decide between cake and breakfast when you can enjoy them both at once? These cake batter pancakes are easy to make, and will leave a sweet impression for sure.

Your Custom Text Here
What are you waiting for?

Why decide between cake and breakfast when you can enjoy them both at once? These cake batter pancakes are easy to make, and will leave a sweet impression for sure.

I thought it was about time to bring back a favorite recipe. I originally posted a "breakfast cookie " recipe on Serious Eats, which was then adapted for my first cookbook, CakeSpy Presents Sweet Treats for a Sugar-Filled Life.
Well, I have brought it back again, and this one is the brunch edition. It has a touch of champagne where most cookies would have vanilla extract. "One tablespoon of champagne?!?" you may exclaim. "What shall I ever do with the rest of the bottle?". Um...it's brunch. I think you'll figure out something, my friend. If all else fails, there's this:

Makes 12 jumbo cookies

Procedure

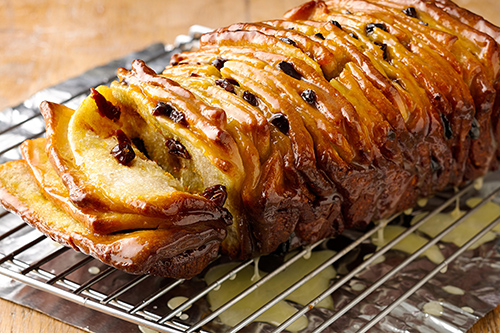
The best thing ever? Cake that masquerades as "breakfast bread". And my new favorite? Babka. Chocolate babka, to be specific.
Chocolate babka first entered my consciousness when it was the subject of a Seinfeld episode. It wasn't until a couple years later, when I lived in New York City, that I tried the stuff--from Zabar's, naturally.
I'll tell you how I felt about babka: I liked it.
Babka makes for sweet eating: a lightly sweetened yeast bread with a feathery texture which is weighted down to seriously sweet territory with an inner swirl of dark chocolate. It makes for an addictive combination, let me tell you.
Apparently, the babka we eat stateside is a bit different from "the original", you know, from the old country. I'm willing to believe that one is good, too, but I am pretty sure I'd still prefer the American version, stuffed with chocolate.
When I paired up with Colavita to make some recipes for their website using their olive oils, I was super-psyched to try out babka sans butter. I have to say, the olive oil works tremendously in this recipe--it has a smooth, lightly fruit-like flavor that brings out the best parts of the bread and chocolate, marrying them in the most delicious way.
To read more about babka, check out the post on the Colavita blog. And here is my awesome babka recipe.
 I need to tell you something. It's this:
Here's the deal. When you are testing recipes, sometimes you end up with extra layers of cake. Even good, high-demand cakes, like red velvet.
I realize that having extra, leftover red velvet cake layers sounds like a luxury--nay, an impossibility. How could a red velvet cake layer be around the house and not be slathered in cream cheese and eaten?
But, well, it did happen. Maybe never again, but it did happen just this once. And I have come up with the most brilliant solution for using this cake.

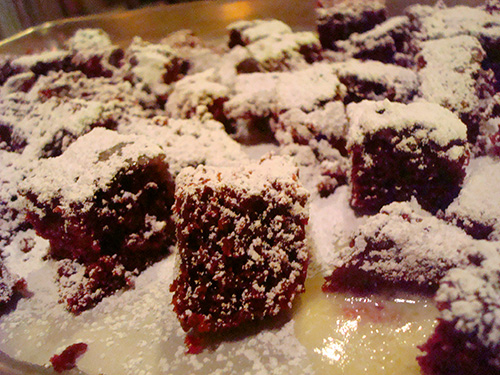
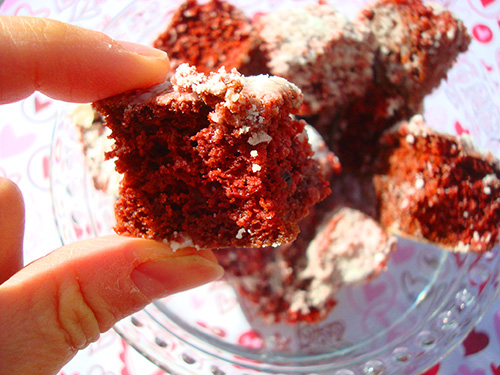
It started with the idea that I would do a sort of twice-baked thing with the cake cubes: red velvet croutons! Why not--you could eat them like cookies, right?
So I put a bunch of red velvet cake cubes on a baking sheet, drizzled it with butter and confectioners' sugar, and put it in the oven until it was all nice and crispy.

Then I set to using the "croutons" in various ways, all of them pleasant...
An ice cream topping:

as simple sweet snacks (like cake chips):
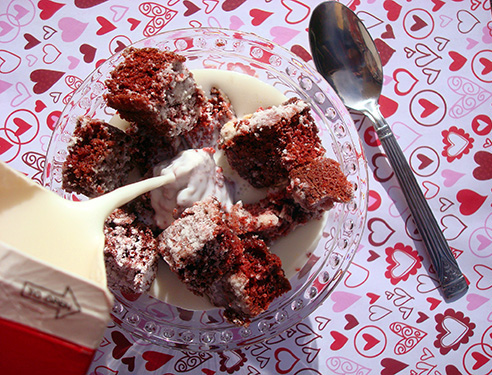
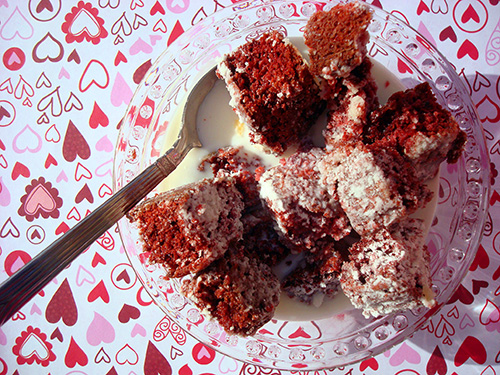
but then, I realized that hey, I could probably put milk on these and eat them as cereal.
And after that moment, all other uses for these red velvet cubes of joy disappeared. Because clearly, red velvet cereal was the winner.
Not quite a believer yet? Well, let me try to sway your affections by telling you some of the distinct advantages of red velvet cereal.
If you'd like to make this magic happen at home, here's how you do it.
Makes many cubes of cereal
Procedure
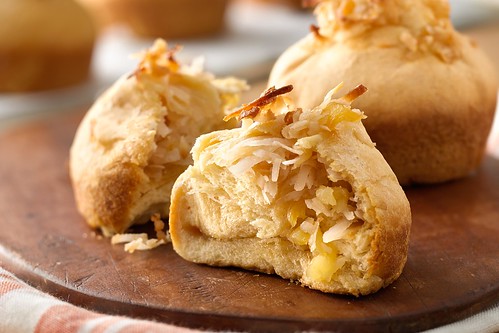
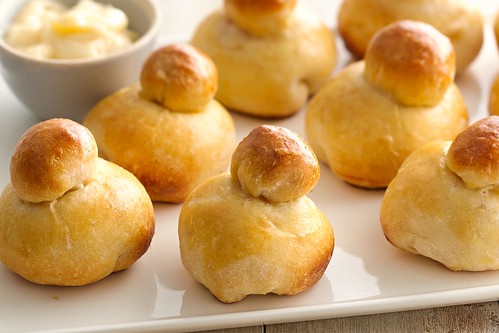
When it gets cool outside, I begin to crave foods that make me think of warmer climates. So these rolls are just perfect for me: kissed with coconut and pineapple, they make me feel like I'm back in Bali for a moment. Now that's sweet! This recipe is via Rhodora Keegan of Virginia Beach, Virginia.
Ingredients
Procedure
Note: the Pillsbury Bake-Off is coming in November! Check out my coverage of the 45th and 46th Bake-Off, and follow the recipes posted so far by clicking the bakeoff tag below.

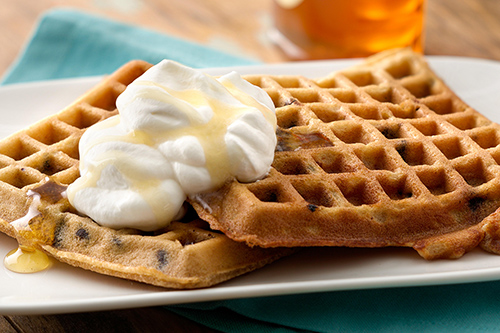
Breakfast is served. And is it ever beautiful: these "waffles" are made using cinnamon rolls! How's that for a decadent delight? Dressed up with strawberries and whipped cream, they're the perfect cold-weather breakfast to carb-o-load for a race you're never gonna run. This one comes from Kelly Humphreys of Vancouver, Washington. Good luck at the Bake-Off!
Ingredients
Procedure
Note: the Pillsbury Bake-Off is coming in November! Check out my coverage of the 45th and 46th Bake-Off, and follow the recipes posted so far by clicking the bakeoff tag below.
I love making people think I'm all fancy in the kitchen when really, I've just lazed around all day and baked something awesome in just 15 minutes. This clever recipe by Christine Wilson of Sellersville, Pennsylvania only takes 15 minutes to make, 45 minutes total (much of that is inactive, though). That means even if you've been watching Mad Men all night and just woke up, you could still get these together in time for brunch. WOO!
Ingredients
Procedure
Note: the Pillsbury Bake-Off is coming in November! Check out my coverage of the 45th and 46th Bake-Off, and follow the recipes posted so far by clicking the bakeoff tag below.
 Let's play a game. I'm going to list a few ingredients, and you guess what meal I'm making.
Here goes:
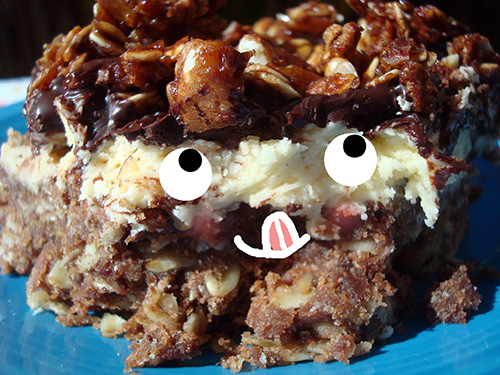
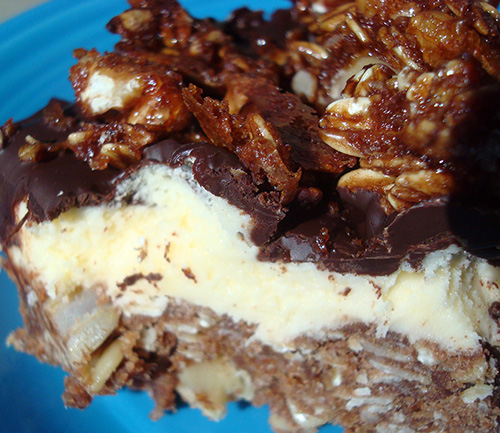
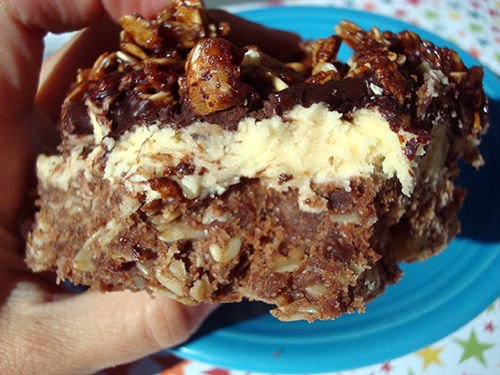
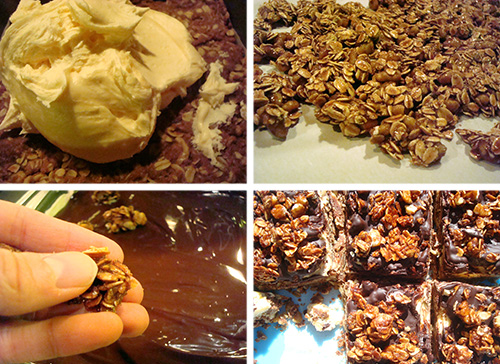
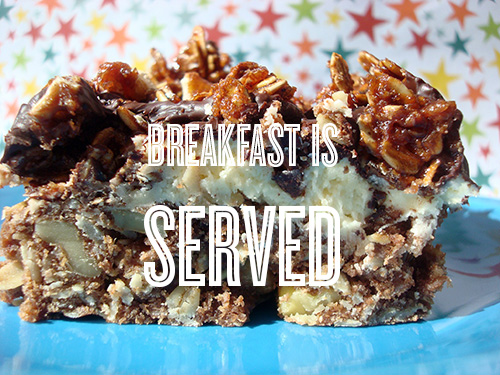
Do you think I'm talking about breakfast? Good, because that means I have sufficiently breakfast-ified these Nanaimo bars, and therefore, they are officially OK for A.M. eating. Why would I want to do such a thing?
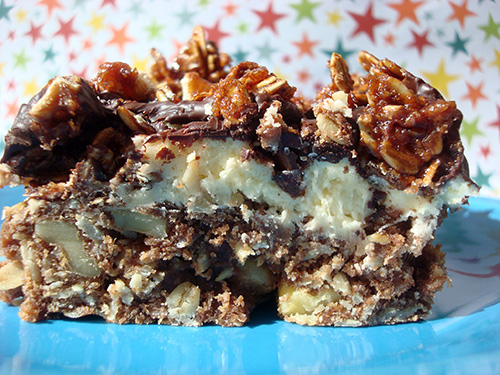
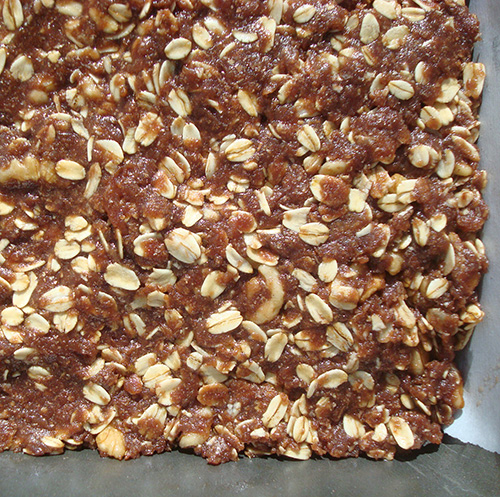
 My logic is this: if you are what you eat, why not start out the day by eating (and being) amazing? These breakfast-friendly Nanaimo bars are the perfect way to start your day right, and an ideal indulgent holiday breakfast treat. They've got enough of the classic makings to be recognizable as the famed Canadian treat, but enough breakfast stylings, such as oats in the crust (which is baked, not simply mixed and no-baked; it is loosely based on the crust used in King Arthur Flour's "President's Day Cherry Squares" recipe) and a tasty crunchy granola on top, that they become an exciting and new thing.
 I'm especially excited to share these as a recipe featuring King Arthur Flour (whole wheat no less--another point for these being health food!). Ever since my awesome Bake For Good experience with the esteemed flour-maker, I've maintained a good relationship with them, and when they recently asked if I'd come up with a breakfast recipe using their flour, I was more than happy to do so!
Oh, and I should tell you, these bars freeze beautifully. You can freeze up to 2 months; let them come to room temperature before serving.
Makes up to 36 tiny bars, or 9 massive breakfast bars
For the crust
For the middle layer
For the top layer
For the granola garnish
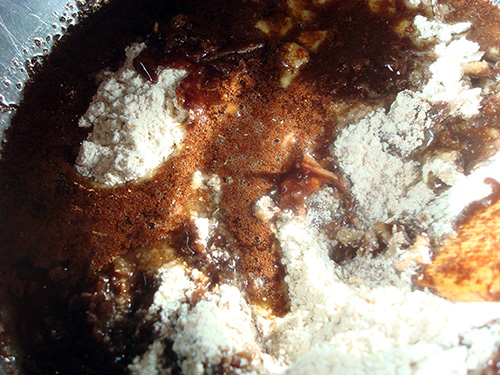
Procedure
Note: the Pillsbury Bake-Off is coming in November! Check out my coverage of the 45th and 46th Bake-Off, and follow the recipes posted so far by clicking the bakeoff tag below.
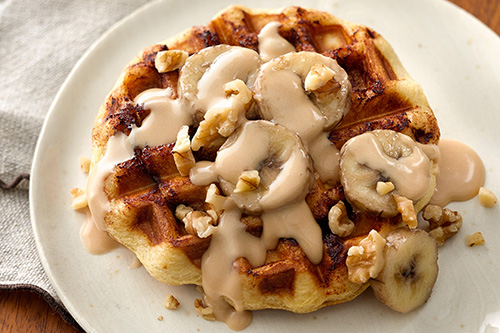
I'm super excited about this entry from Mimi Chang from Middletown, New Jersey. First and foremost, because who doesn't like waffles? I even have a waffle wallet--not kidding.
Second, Mimi is from my neck of the woods in New Jersey! Good luck at the Bake-Off!
Ingredients
Procedure
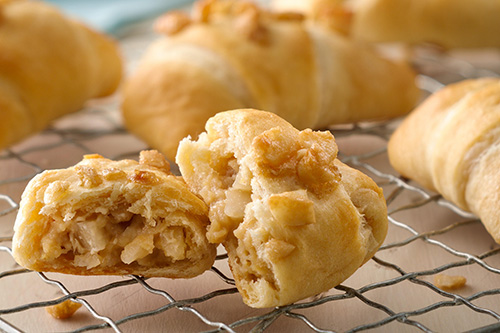
You know what's great? Biting into a morning breakfast roll and finding a sweet, creamy filling. Yes, yes, yes!
This sweet treat is courtesy of Linda Sellner of Hooksett, New Hampshire. Good luck at the Bake-Off!
Ingredients
Procedure
CakeSpy Note: The Pillsbury Bake-Off is coming in November! Since I so deeply loved attending the 45th Bake-Off as well as the 46th Bake-Off, I thought I would get you excited the 47th one early by sharing all of the sweet recipes in the running. Follow them by clicking the bakeoff tag below to see the recipes posted so far.
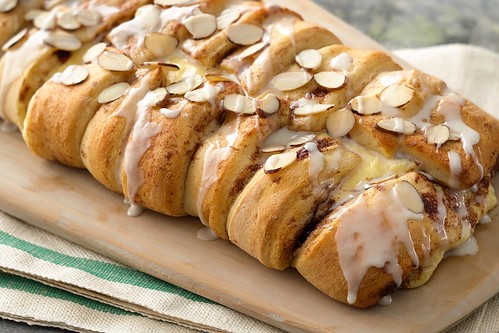
How do you make cinnamon rolls even better?
No, that's not a trick question. And Barbara Lento of Houston, Pennsylvania, has the answer: by macaroon-ifying it. Yes indeed: this cinnamon roll braid is infused with coconut and coconut extract to make a gooey and delightful AM treat.
Ingredients
Procedure
Note: the Pillsbury Bake-Off is coming in November! Check out my coverage of the 45th and 46th Bake-Off, and follow the recipes posted so far by clicking the bakeoff tag below.
 CakeSpy Note: The Pillsbury Bake-Off is coming in November! Since I so deeply loved attending the 45th Bake-Off as well as the 46th Bake-Off, I thought I would get you excited the 47th one early by sharing all of the sweet recipes in the running. I will focus on sweets! You can follow them by clicking the bakeoff tag below to see the recipes posted so far.
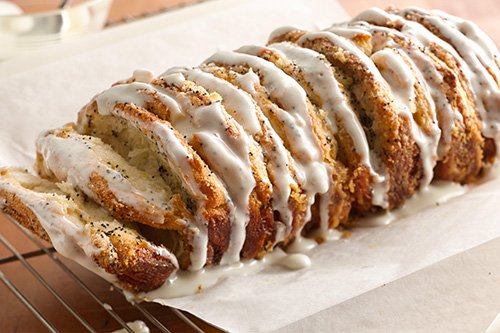
I'm sorry, but there's a town called Mound, Minnesota? If I ever went there I'd only eat Mounds candy bars, I can promise you that.
Luckily, Cathy Wiechert of Mound, Minnesota has moved beyond the candy bar to this tasty lemon-poppyseed pull-apart bread, which is her entry in this year's Bake-Off. Good luck, Cathy!
Ingredients
Procedure

Prunes have a bit of a reputation for being a food beloved by cranky old people. I say this lovingly, because my grandma is one of those cranky old people.
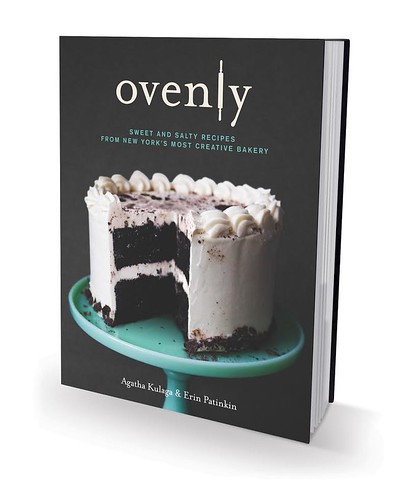
But here's the thing: I like prunes. And I think you will, too, especially when they're accompanied by deliciously fried paczki, a sort of Polish doughnut which is famous especially around Lent. This recipe is excerpted from Ovenly: Sweet and Salty Recipes from New York's Most Creative Bakery. Enjoy!
PS: If prunes aren't your bag, there's a blueberry jam recipe at the bottom, too.
PĄCZKI WITH PRUNE BUTTER
Yield: approximately 20 pączki
I kinda hate doughnuts. An unfortunate mishap involving a cruller at a gas station in rural Wisconsin when I was ten years old scarred me for life. But then came pączki. Pączki (pronounced ponch-ky) are served in Poland on Easter, and the first year we met, incredulous that I hated doughnuts, Agatha bought one for me from a local Greenpoint bakery. Hot, crispy, tender and sweet, she proved to me that doughnuts could be awesome (though I’m still cruller averse). For our cookbook, Agatha’s dad, Zdzislaw, sent us a recipe from Agatha’s great aunt, with a serious note reminding us that pączki are good to make no matter the time of year. In homage to Eastern Europe, we’ve stuffed our version with prune butter, but any fruit spread will do.
Ingredients
Procedure
1. Heat the whole milk in a small saucepan over medium-low heat, to 110⁰F to 115⁰F.
2. Dissolve the yeast in the warm milk in a medium bowl. Add 1 tablespoon of the sugar and a ½ cup of the flour, whisk together thoroughly and set aside.
3. In a small saucepan or in a small, microwave-safe bowl in a microwave oven, melt the butter and set aside to cool.
4. In a separate small bowl, vigorously whisk together the remaining 4 tablespoons and ½ teaspoon sugar, egg yolks and rum until frothy.
5. Place the remaining 5¾ cups flour in a large bowl. Whisk the yeast mixture again, and pour it over the flour. Add the egg mixture, and mix with a wooden spoon or a spatula until the dough just starts to come together. Add the melted butter, and combine until smooth.
6. Liberally flour a work surface, and turn the dough out onto it. Knead the dough until it comes together and no longer sticks to your hands when worked. If the dough seems dry, add a little more milk and knead. If the dough seems too wet, add a bit more flour.
7. Lightly oil a large bowl and place the dough in it. Cover with a towel or plastic wrap, and let rise in a warm area until it doubles in size (about 1 hour).
8. Punch the dough down and separate it into 2 balls. Flour your work surface again, and roll the first ball into a disk about ½-inch thick.
9. Using a 3-inch cookie cutter or an inverted drinking glass, cut rounds out of the dough. Set the scraps of dough aside.
10. Place 1 tablespoon prune butter in the center of 1 of the rounds. Top it with another round, and pinch the seams with your fingers to seal the edges. Then bring together the edges of the dough on 1 side to create a sphere (see process below), and pinch to make a new seam. Reshape each ball with your hands to re-form it into a fluffy round shape. Repeat this process for the remaining rounds. Set each filled pączki on a floured surface.
11. Repeat this process with the remaining ball of dough. Reroll all the scraps of dough, and repeat this process again.
12. Let the filled pączki rise for 20 minutes, or until fluffy.
13. After the pączki have risen for 15 minutes, heat the oil in a heavy-bottomed steel or cast-iron skillet to 350ºF on a candy thermometer, and line a large plate or a cooling rack with paper towels.
14. Once the oil is ready, use a slotted spoon to carefully place 3 or 4 pączki in the hot oil. Fry for 45 seconds, or until golden brown on 1 side. Flip the pączki and fry on the other side until golden brown, about 25 to 35 seconds.
15. Remove the pączki from the oil immediately and transfer to the prepared plate or cooling rack.
16. Let the pączki cool completely. Using a fine-mesh sieve, sprinkle them with confectioners’ sugar. Serve immediately.
Pączki Process:
Once the prepared dough is rolled out, use a 3-inch cookie cutter or an inverted drinking glass to cut rounds out of the dough.
Place the filling in the center of 1 of the rounds.
Top it with another round.
Repeat this process with the remaining rounds.
Pinch just the ends with your fingers to seal the edges securely.
Reshape the pączki so that they are fluffy and round, and set them aside to rise for 20 minutes.
Heat the oil in a skillet to 350ºF. Fry the pączki until they are golden brown on each side.
Remove the pączki from the oil and transfer them to a plate or a cooling rack lined with paper towels to drain.
Using a fine-mesh sieve, sprinkle the cooled pączki with confectioners’ sugar.
Note: To ensure your pączki are perfectly fried but not greasy, heat your oil to 350⁰F before frying and reheat it to 350⁰F between batches.
QUICK & EASY BLUEBERRY JAM
Yield: approximately 1½ cups
What better accompaniment to a scone than butter and jam? Since we sell a lot of scones at Ovenly, we go through a lot of fixin’s, as well. With all the fruit we have on hand, it was a no-brainer for us to start making our own jam. Don’t be intimidated: all you have to do is throw everything into a large pot, heat and…wait.
1. Place the blueberries and honey in a medium saucepan. Heat over medium-high heat, stirring constantly to prevent burning, for 4 minutes.
2. After about 4 minutes, the blueberries will start to sweat. Turn the heat up to high, and stir until the liquid comes to a boil. Then reduce the heat to medium-low and allow the mixture to simmer for about 18 to 20 minutes, stirring every 3 to 4 minutes. The mixture thickens as it reduces.
3. For a juicier jam, reduce the cooking time by a few minutes. For a thicker consistency, cook the jam for the full 20 minutes. The longer you cook the jam, the thicker it will be.
4. Set the jam aside to cool and thicken fully. Store it in the refrigerator for up to 1 week.
CakeSpy Note: OMG! It's getting to be that time of year again. The Pillsbury Bake-Off is coming in November! Since I so deeply loved attending the 45th Bake-Off as well as the 46th Bake-Off, I thought I would get you excited the 47th one early by sharing all of the sweet recipes in the running. I will focus on sweets! You can follow them by clicking the bakeoff tag below to see the recipes posted so far (as well as recipes from previous Bake-Off events).
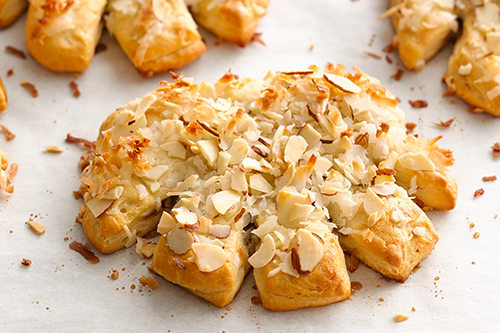
Gerald Martinez of Westminster, Colorado deserves an award: for the cutest pastry name in the running at this year's Bake-Off! Not that it's that different from "bear claw", but somehow the "grizzly" referring to a flaky coating of coconut makes me coo. That's cute! Plus, the pastries are a fine way to start the morning, made from biscuit dough reconfigured and filled with a date-nut mixture. Good luck at the Bake-Off!
Grizzly Bear Claws
Ingredients
Procedure
 CakeSpy Note: OMG! It's getting to be that time of year again. The Pillsbury Bake-Off is coming in November! Since I so deeply loved attending the 45th Bake-Off as well as the 46th Bake-Off, I thought I would get you excited the 47th one early by sharing all of the sweet recipes in the running. I will focus on sweets! You can follow them by clicking the bakeoff tag below to see the recipes posted so far (as well as recipes from previous Bake-Off events).
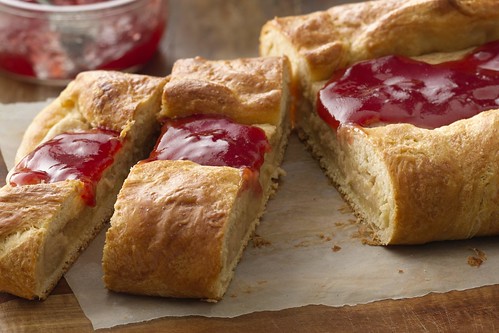
I'll tell you what including cherries and orange in your breakfast bread means. That means it is health food.
But the best kind of health food ever, because it's accompanied by a generous amount of sugar and almond extract to make a dreamy carbohydratey treat! This feat of breakfast brilliance was dreamed up by Maria Rokas of San Francisco, California. Good luck at the Bake-Off!
Ingredients
Procedure
 CakeSpy Note: OMG! It's getting to be that time of year again. The Pillsbury Bake-Off is coming in November! Since I so deeply loved attending the 45th Bake-Off as well as the 46th Bake-Off, I thought I would get you excited the 47th one early by sharing all of the sweet recipes in the running. I will focus on sweets! You can follow them by clicking the bakeoff tag below to see the recipes posted so far (as well as recipes from previous Bake-Off events).
Using chocolate chip cookie dough to make waffles? It simply baffles the mind!
These clever waffles come together from a base of (gluten-free) cookie dough with just a few ingredients added to give it a more waffle-batter like consistency. The resulting treats? Well, let's say brunch is gonna rule at your house this weekend, or any weekend you make them. This recipe is courtesy of Julee Shapiro of Los Angeles. Good luck at the Bake-Off!
Ingredients
Procedure
I'll be straight up with you: I'm not really a cereal person. On a restaurant menu, I totally glaze over the cereal or grain section in favor of more exciting choices such as pancakes or eggs or French toast. Or a vanilla kreme filled donut. You know.
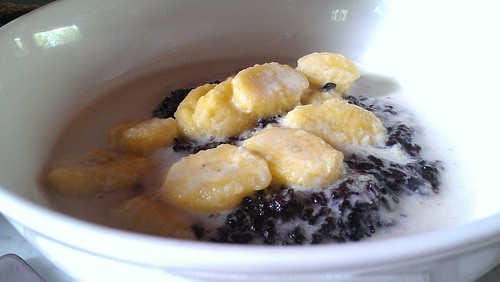
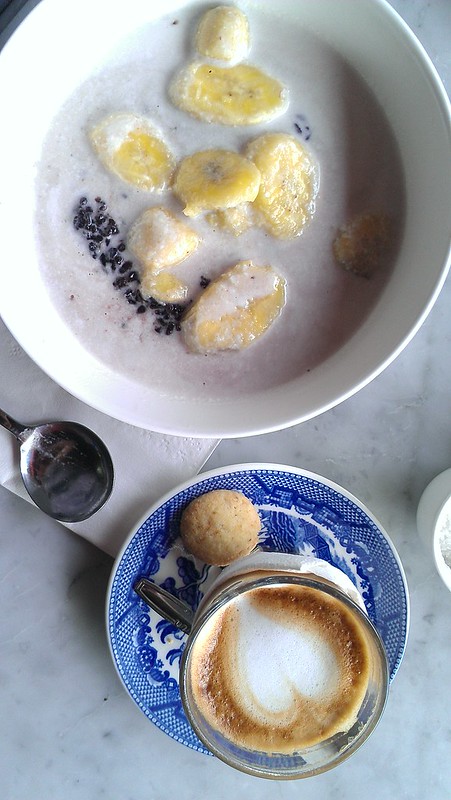
But I have discovered a treat in Bali that really revs my engine in the morning (yes, I just said that), and its name is Black Rice Pudding. It's wonderful, sweet, and provides me with ample energy for doing tons of yoga. This is actually me:

I know, I totally rule, right??
But back to the rice pudding. Actually, it doesn’t have to be a beginning of the day treat. The pudding can be eaten as a porridge-like morning food, or as a more rice pudding-y dessert. Black rice sweetened with palm sugar and wrapped in banana leaves can also be found at the markets for a traditional treat.
But to keep things fairly simple, I'm going to stick with the breakfast version, because it's my favorite time to enjoy this sweet treat. Plus, if it's technically breakfast, then it's ok to order dessert, too.
So what should you expect when you order black rice pudding?
The black rice is lightly boiled and then served in any number of slight variations on this basic method: with palm sugar-soaked coconut milk and bananas on top. I don't know how these fairly virtuous ingredients do it, but when they come together, they will make you want to keep eating until you burst open in some sort of carbohydratey explosion.

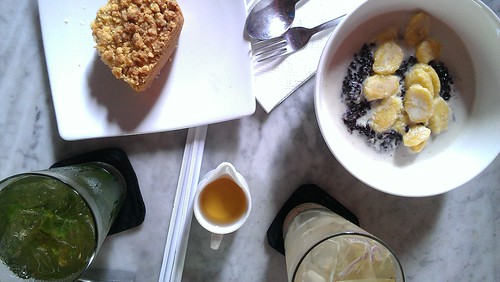
One of my favorites so far was from famed restaurant Casa Luna (home of a literary festival and a bakery--I felt very at home), where they serve it in a big bowl, made in the exact way detailed above. The rice itself is sort of al dente textured, but it softens as you eat it--almost like how Grape Nuts start out gravelly but then turn nice and soft in the milk. As the rice became soaked with the sweet coconut sugar mixture, each kernel became a vessel for transporting a mini burst of awesome in my mouth. There were just enough bananas to keep things interesting, but not too many so as to be distracting. This was a thoroughly happy food to eat.
But you don't have to limit yourself to Casa Luna for consuming this delicious treat. It's a common item on menus, and can typically be made any time of day.
I found a good-looking black rice pudding recipe in case you're intrigued. And I found another one that is like a tricked out version. It sounds about right to me, and I am going to give it a try when I am back home. Although more and more, Bali is starting to seem like home!
Love from Bali,
CakeSpy
Mentioned: Casa Luna, Jalan Raya Ubud, Bali. Online here.
CakeSpy Note: OMG! The 46th Annual Pillsbury Bake-Off is coming! Since I so deeply loved attending the 45th Bake-Off, I thought I would get you excited early by sharing some of the finalists' recipes. Do I need to tell you that the winner will receive one million dollars? My posting is on hyperdrive since the event is less than a week a day--check back often, because I will be posting recipes like crazy until the big event!
I love peanut butter. I love jelly. But especially, I love danish. This pastry brings all three together in a perfect breakfastly matrimony. And it's dreamed up by a fellow Jersey girl: Julie Paolella of Galloway, New Jersey!
PB+J Breakfast Danish
Prep Time: 30 Min Total Time: 1 Hr 15 Min Makes: 8 servings
Ingredients
Procedure
CakeSpy Note: OMG! The 46th Annual Pillsbury Bake-Off is coming! Since I so deeply loved attending the 45th Bake-Off, I thought I would get you excited early by sharing some of the finalists' recipes. Do I need to tell you that the winner will receive one million dollars? My posting is on hyperdrive since the event is less than a week a day--check back often, because I will be posting recipes like crazy until the big event! You can follow them by clicking the bakeoff tag below the post to see which ones have been posted so far. Enjoy!
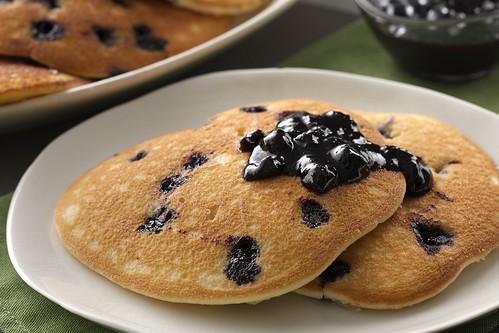
Breakfast is served! And since it has fruit, it's health food. Right? Of course, the sugar cookie dough in the batter doesn't hurt anything. This recipe comes from Michele Kusma of Columbus, Ohio. #nom!
Blueberry Sour Cream Pancakes
Prep Time: 25 Min Total Time: 25 Min Makes: 6 servings (2 pancakes each)
Ingredients
Procedure
CakeSpy Note: OMG! The 46th Annual Pillsbury Bake-Off is coming! Since I so deeply loved attending the 45th Bake-Off, I thought I would get you excited early by sharing some of the finalists' recipes. Do I need to tell you that the winner will receive one million dollars? My posting is on hyperdrive since the event is less than a week a day--check back often, because I will be posting three recipes a day until the big event! You can follow them by clicking the bakeoff tag below the post to see which ones have been posted so far. Enjoy!
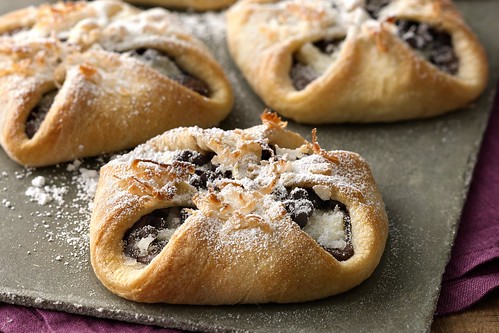
Donna Fogel Whitehall, Pennsylvania
Prep Time: 10 Min Total Time: 35 Min Makes: 6 servings
Ingredients
Heat oven to 375°F. Reserve 1 tablespoon of the coconut. In small bowl, beat cream cheese and remaining coconut with electric mixer on medium speed until well blended. Set aside.
Sprinkle flour on work surface; unroll dough over flour. Press into 12 x 7 1/2-inch rectangle. Cut into 6 squares. Spread each square with 1 rounded tablespoon mocha cappuccino hazelnut spread to within 1/2 inch of edges. Top each with 1 rounded tablespoon coconut mixture and 2 teaspoons chocolate chips. Bring corners of dough together over filling; pinch to seal. Sprinkle with reserved coconut; gently pressing onto top and sides. Place on nonstick cookie sheet.
Bake 11 to 15 minutes or until golden brown. Cool 10 minutes. Sprinkle with powdered sugar. Serve warm or cool.